

The arm lift scar is often the first concern Canadian patients raise when they begin researching brachioplasty. That concern is reasonable. Unlike facial surgery scars that can hide in hairlines or natural creases, an arm lift incision must follow the area where excess upper-arm skin is removed.
For the right patient, an arm lift can create a smoother, lighter, more proportionate upper-arm contour. The trade-off is a visible healing line. The goal is not to pretend the scar does not exist. The goal is to place it carefully, close it without unnecessary tension, and manage it through the full maturation period.
This guide explains how arm lift scars are planned, how they usually heal over 12 months, and what Canadian patients should expect before choosing an arm lift procedure at AKM Clinic. It focuses specifically on scar placement and scar healing. For body contouring patients comparing several procedures at once, mommy makeover, which sometimes includes arm lift, is covered separately.
Quick summary: The arm lift scar is the single biggest concern many Canadian patients bring to consultation because the incision usually runs along the inner upper arm. Scar visibility depends on arm lift incision placement, skin quality, surgical closure, tension control, and consistent aftercare. Most scars are red or pink in the early months, then gradually flatten and fade through the 6- to 12-month window.
Table of Contents
The Reality of Arm Lift Scars
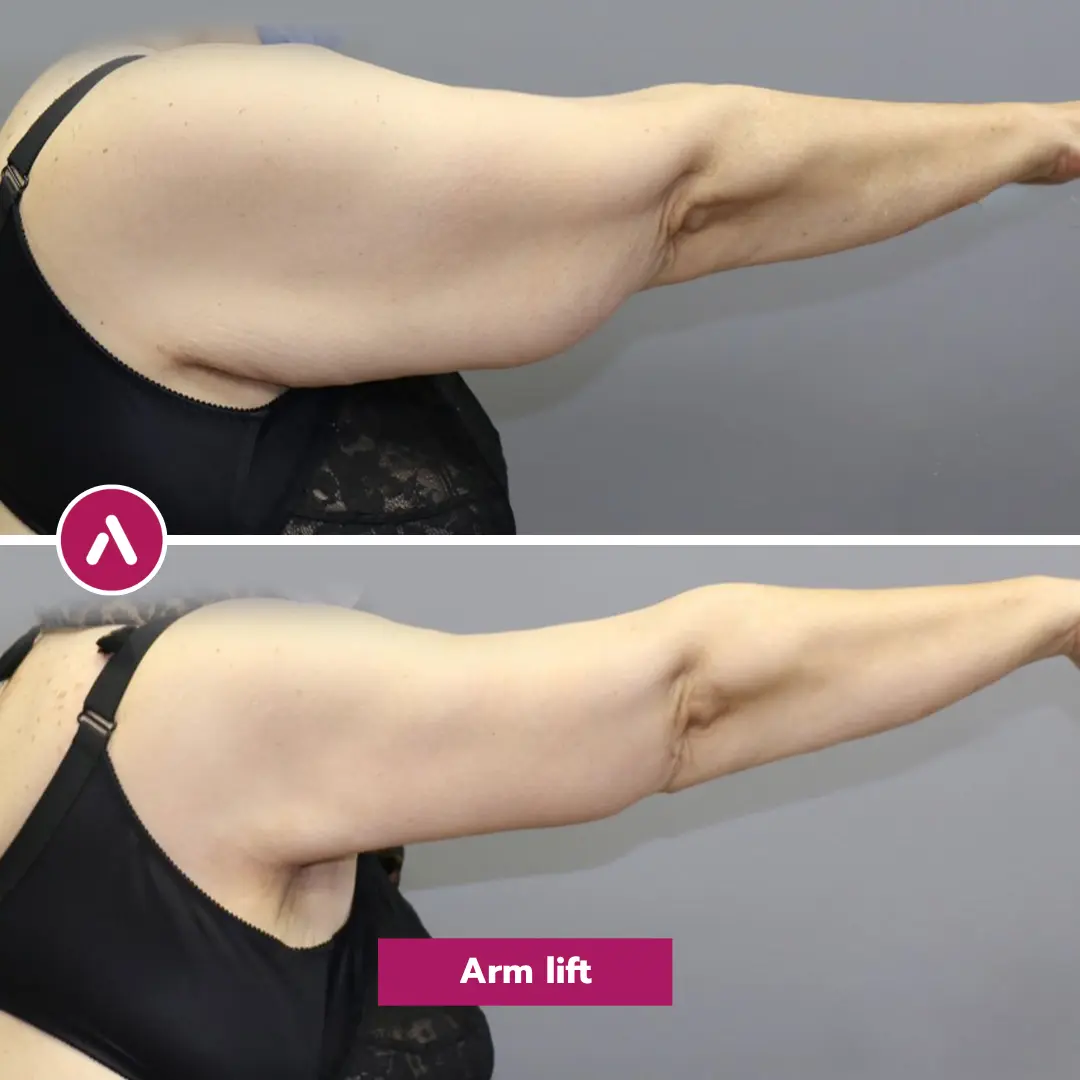
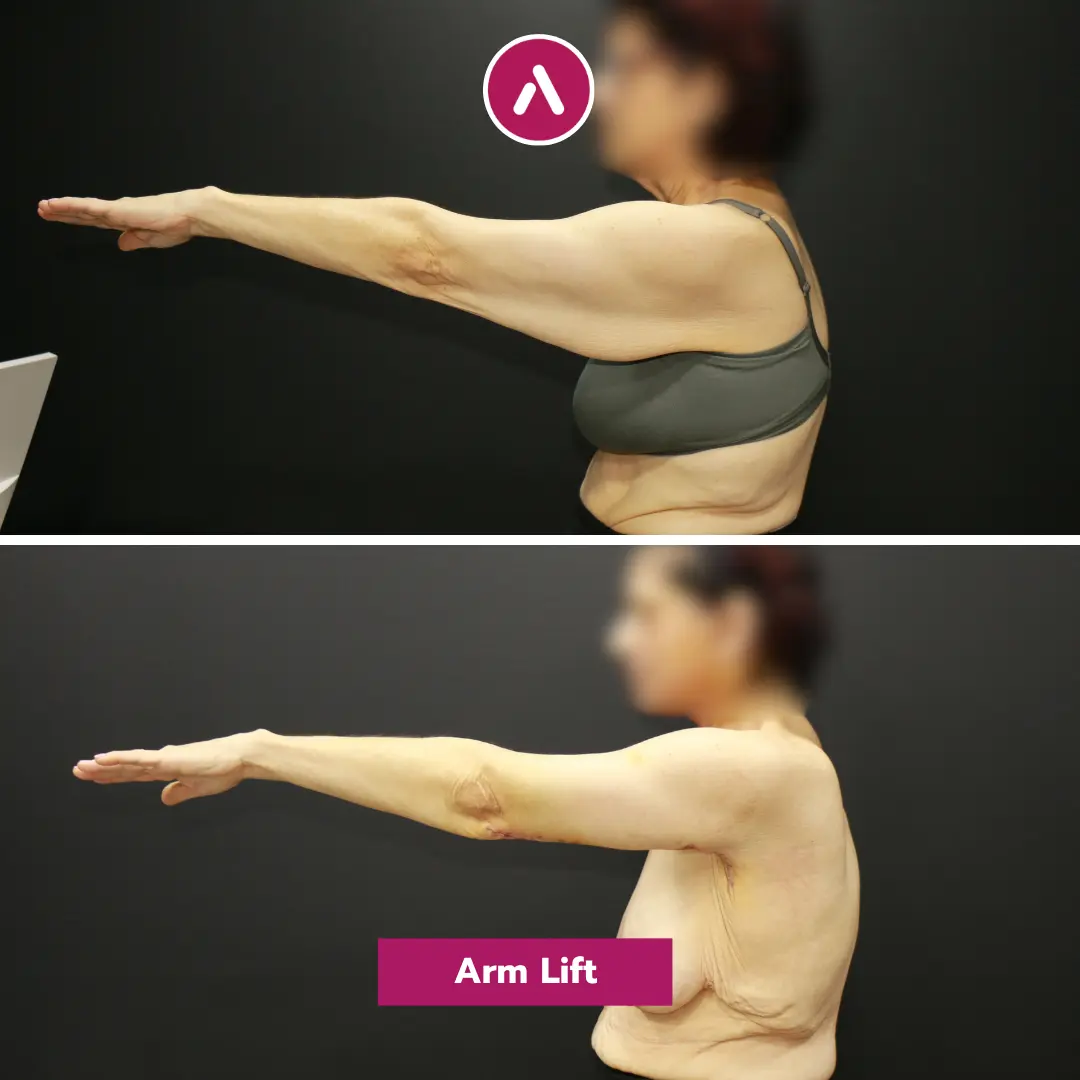
An arm lift, or brachioplasty, removes loose upper-arm skin that cannot be corrected with exercise, compression, or liposuction alone. Because skin is physically removed, a scar is part of the procedure. A good surgical plan reduces its visibility, but no ethical surgeon should promise a scar-free arm lift.
For Canadian patients from Toronto, Vancouver, Calgary, or Montreal, the decision often comes down to a practical question: is the improvement in arm shape worth the scar? The answer depends on the degree of skin laxity, the patient’s clothing preferences, and how comfortable they feel with a scar that matures slowly. Honest planning matters.
Why arm lift scars exist
Arm lift scars exist because excess skin has to be removed in a controlled pattern. After major weight loss, aging, or genetic skin laxity, the upper arm can develop hanging tissue between the armpit and elbow. This tissue is often called a “bat wing,” but the clinical issue is skin redundancy.
Liposuction can reduce fat volume, but it cannot reliably shrink significant loose skin. If skin elasticity is poor, removing fat alone may make the hanging appearance more obvious. That is why brachioplasty uses an incision: it allows the surgeon to remove skin, reshape the arm, and close the remaining tissue in a smoother line.
The longer the loose-skin area, the longer the incision usually needs to be. A small amount of laxity near the armpit may suit a shorter scar. Skin that extends toward the elbow often requires a standard arm lift incision. Severe laxity may need an extended pattern.
Why they cannot be eliminated
Every surgical incision heals by forming collagen. That collagen is the scar. Even with excellent technique, the body must build a repair line where the skin has been opened and closed.
Scar quality varies between patients. Some people form thin, pale scars. Others develop darker, raised, itchy, or widened scars. Genetics, skin tone, tension, smoking history, sun exposure, and aftercare all influence the result.
This is why the correct question is not “Can I avoid an arm lift scar?” A better question is “Where will the scar sit, and how can we help it heal as discreetly as possible?” That is the conversation that should happen before surgery, not after.
What honest expectation setting looks like
Honest scar planning begins with a mirror conversation. The surgeon should show where the incision is likely to sit when the arm is relaxed, when it is raised, and when it is viewed from behind. These positions matter because arms are mobile. A scar that looks hidden in one position may be more visible in another.
Patients should also understand the timing. At 4 to 8 weeks, the scar may look more noticeable than expected. That does not mean it has healed poorly. Early redness and firmness are part of normal scar biology.
By 6 months, most scars look calmer. By 12 months, the scar is usually flatter, softer, and closer to its mature colour. Some patients continue to improve for 18 months, especially if the scar was initially red or raised.
“A good arm lift scar is not created in one moment. Placement, closure, tension control, and patient aftercare all work together. Surgical skill matters, but scar quality also depends on what happens during the months after surgery.”
Incision Placement Options
Arm lift scar placement is a balance between access and concealment. The surgeon needs enough access to remove loose skin safely, yet the scar should sit where it is least disruptive in daily life. The best placement depends on arm shape, skin excess, shoulder mobility, and how the patient naturally carries their arms.
Canadian patients often ask how the scar will look in sleeveless clothing, gym wear, professional attire, and summer clothing. This is especially relevant for patients planning surgery in winter so the early healing phase can happen under long sleeves. The placement decision should account for both anatomy and lifestyle.
Inner arm placement
The inner arm placement is the standard approach for many brachioplasty patients. The incision usually runs along the inner aspect of the upper arm, often from the armpit toward the elbow. When the arms rest naturally at the sides, the scar is less visible from the front or back.
This approach gives strong access for skin removal. It is especially useful when laxity runs along most of the upper arm. For many patients, it produces the most meaningful contour change.
The limitation is visibility when the arm is raised. Activities such as waving, reaching, fitness training, or wearing sleeveless clothing may expose the scar. Patients who accept this trade-off often do so because the improvement in arm shape feels worth it.
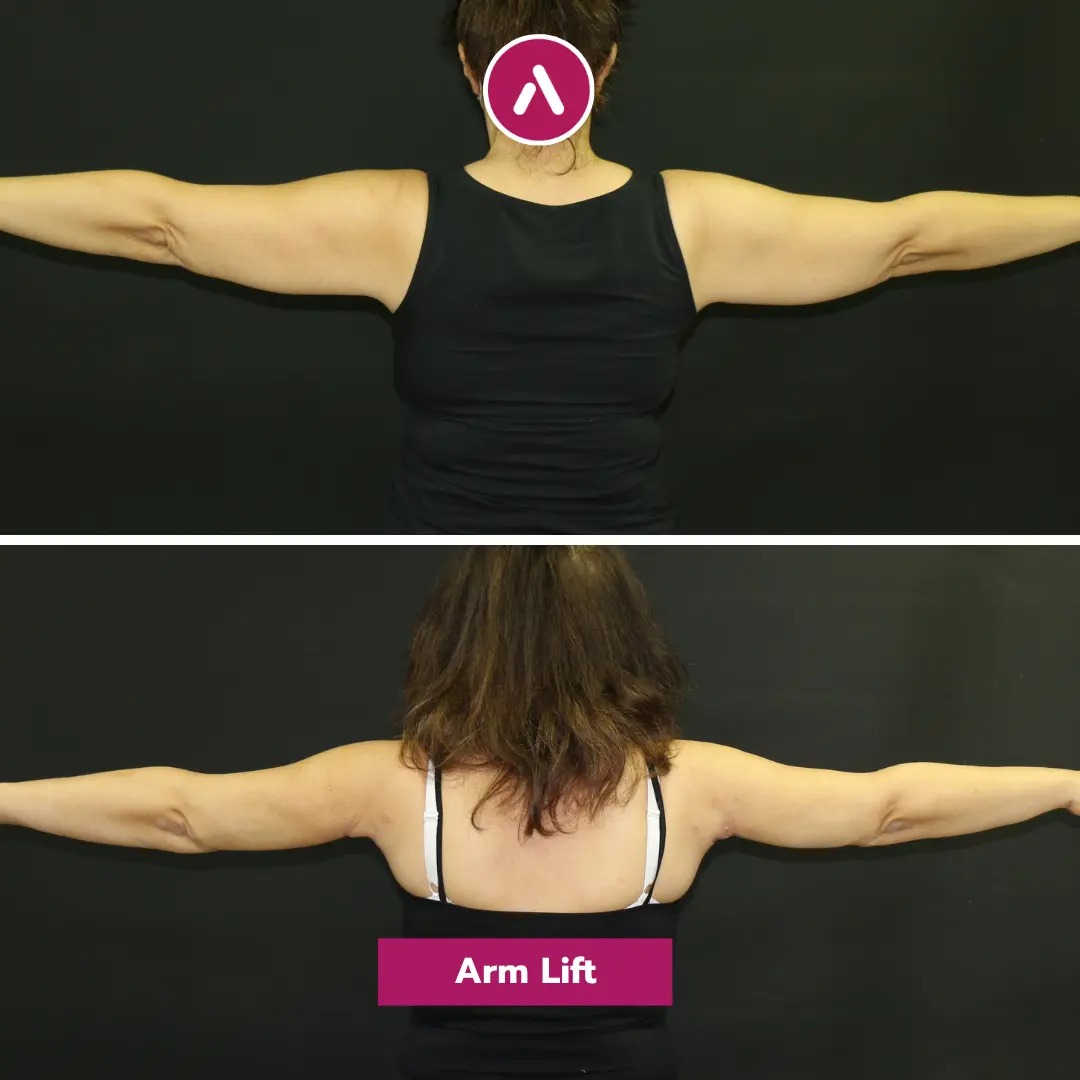
Posterior placement
Posterior placement moves the scar slightly toward the back of the arm. The advantage is that it may be less visible during some natural arm movements, especially from the front. For some body types, this placement creates a cleaner visual line.
The trade-off is that a posterior scar can be visible from behind. It may also be under different tension during movement. Tension matters because a scar under repeated pull is more likely to widen.
This option is not automatically better than inner arm placement. It depends on where the skin excess sits. A careful consultation should compare both options using the patient’s actual arm anatomy rather than a generic scar diagram.
Mini brachioplasty
Mini brachioplasty uses a shorter incision, often near the armpit. It is designed for patients with limited upper-arm laxity close to the axilla. In the right patient, the scar is shorter and easier to conceal.
The key phrase is “in the right patient.” A mini arm lift cannot correct loose skin that extends toward the elbow. If the surgeon uses a mini incision for a patient who needs a standard lift, the lower arm may remain loose, and the patient may feel under-corrected.
Mini brachioplasty is attractive because the scar is smaller. Still, scar length should not be the only decision factor. The real goal is the best match between the skin problem and the incision pattern.
The Scar Healing Timeline
An arm lift scar changes more slowly than many patients expect. The arm may look smoother within weeks, but the incision line continues remodelling for many months. This is normal scar biology, not a sign that the scar has “failed.”
The first year is the most important window. During this time, the scar usually moves through three broad stages: closure, early maturation, and final maturation. Each stage has a different look, feel, and care priority.
| Timeline | Typical Appearance | Sensitivity | Usual Scar Care Focus |
|---|---|---|---|
| Day 0 | Closed incision with dressings or surgical tape | Tightness, numbness, mild burning | Protection, no tension, clean dressings |
| Week 1 | Pink or red incision line, mild swelling | Tenderness with arm movement | Wound checks, limited stretching, careful hygiene |
| Month 1 | More visible red or pink scar; may feel firm | Itching or pulling sensation | Begin approved silicone care once fully closed |
| Month 3 | Scar may still be red, but flatter | Less tenderness, occasional tightness | Silicone, scar massage if cleared, sun protection |
| Month 6 | Scar begins fading toward lighter colour | Usually low sensitivity | Ongoing UV avoidance and scar refinement |
| Month 12 | Mature scar; flatter, softer, paler in many patients | Minimal sensitivity for most patients | Assess whether revision or laser refinement is needed |
Day 0 to Week 2 — closure phase
The closure phase is about protection. The incision is fresh, the skin edges are healing, and the arm should not be stretched aggressively. This is the period where patients must be patient with movement.
In the first few days, the scar itself may be hidden under dressings or surgical tape. You may feel tightness along the inner arm, especially when reaching forward or lifting the arm away from the body. That tight sensation is expected after skin removal.
The main goal is to avoid tension. Tension can widen a scar before it has enough strength. Canadian patients flying home after surgery should also avoid pulling heavy carry-on luggage, lifting overhead bags, or carrying winter coats and personal items on the operated arm.
Week 3 to Month 3 — early maturation
Early maturation is often the most emotionally challenging stage. The arm shape may already look better, but the scar can appear red, pink, raised, or firm. Some patients worry at this point because the scar looks more obvious than it did in the first two weeks.
This stage is active collagen remodelling. The scar is gaining strength, but it is also biologically reactive. It may itch, feel tight, or look darker after a warm shower or activity.
Silicone care, scar massage if cleared by the surgical team, and low-tension movement usually become more relevant during this phase. Patients should not start aggressive massage or topical products without clearance. A closed surface does not always mean the deeper tissue is ready.
Month 3 to Month 12 — final maturation
Final maturation is slower and quieter. The scar gradually softens. Redness often fades. Raised areas may flatten, although some patients need additional support if they tend to form hypertrophic or keloid scars.
By Month 6, many patients feel more comfortable in short sleeves, especially in casual settings. By Month 12, the scar has usually reached a much more stable appearance. Some scars continue improving after that point.
This is also when revision decisions become more realistic. A scar that looks active at Month 3 may settle beautifully by Month 12. A scar that remains thick, raised, widened, painful, or very dark at 12 months deserves a more detailed assessment.
Scar Care Protocol — Days, Weeks, Months
Scar care works best when it follows the healing stage. Doing the right thing too early can irritate the incision. Waiting too long can allow a raised or widened scar to become harder to improve. The aim is steady, stage-appropriate care.
At AKM Clinic, scar care is usually discussed before surgery and reinforced during recovery. Patients returning to Canada should leave Istanbul with clear instructions for wound care, product timing, activity limits, and when to send photos to the clinic team.
Wound care in the first 2 weeks
The first two weeks are not about scar “treatment.” They are about wound protection. The incision must close cleanly before silicone sheets, gels, massage, or laser-based therapies become appropriate.
During this stage, patients should follow the dressing plan exactly. Keep the incision clean and dry according to the surgical instructions. Avoid friction from tight sleeves, compression garments that fold into the incision, or repetitive reaching.
Common early priorities include:
- Keeping dressings intact unless instructed otherwise
- Avoiding heavy lifting and overhead arm movement
- Watching for redness that spreads beyond the incision
- Sending follow-up photos if healing looks uneven
- Protecting the incision from rubbing during sleep
Patients should contact their care team if they notice drainage, fever, increasing pain, wound separation, or redness that expands rather than settles. Early reporting is safer than waiting.
Silicone sheet timing
Silicone sheets and silicone gels are widely used in scar management because they help hydrate and protect the healing scar surface. Canadian dermatology guidance commonly places silicone use after the skin surface has fully restored, rather than while the incision is still open.
For many patients, silicone begins after the incision has sealed and the surgical team confirms it is safe. This may be around a few weeks after surgery, but the exact timing varies. Starting too early can trap moisture, irritate fragile skin, or interfere with closure.
Silicone care is a long-term habit. It often requires daily use for several months. Patients who use it inconsistently may still heal well, but they lose one of the easiest tools for improving scar texture and colour.
The same principles used in tummy tuck scar care principles applied to arm lift also matter here: low tension, consistent silicone use, sun avoidance, and early attention to raised areas. The location is different, but the scar biology is similar.
LLLT integration
Low-Level Laser Therapy, or LLLT, supports healing by stimulating cellular energy production without heating or damaging the skin. AKM Clinic uses a system with medical-grade semiconductor laser diodes as part of its recovery technology approach.
For arm lift patients, LLLT may help calm inflammation, support incision maturation, and improve early scar quality. It should be viewed as support, not a substitute for careful closure, silicone care, or UV protection.
Patients who want to understand the clinic’s technology standards can review AKM’s LLLT and scar minimization technology. For a broader procedure-neutral explanation, see LLLT laser therapy for scar minimization.
Consumer red-light devices are not the same as a clinical LLLT protocol. Wavelength, energy delivery, session structure, and medical oversight all matter. If you continue light-based silicone scar care in Canada, ask the treating provider what device they use and whether it is appropriate for a post-surgical brachioplasty scar.
Canadian scar-care guidance also supports the principle of matching treatment timing to wound closure and scar maturity. A helpful Canadian dermatology discussion of scar care timing can be found through Canadian Dermatology Today.
Canadian Climate and Sun Exposure
Scar care does not happen in a vacuum. Canadian weather changes what patients wear, how much sun their arms receive, and how easy it is to keep a healing scar covered. A patient recovering in February in Ottawa has a very different scar-exposure pattern than someone recovering in July in Vancouver.
For arm lift patients, this matters because immature scars are sensitive to ultraviolet exposure. UV can darken a healing scar, increase contrast against surrounding skin, and prolong redness. The safest approach is to treat the first 12 months as a scar-protection year.
UV protection for the 12-month sensitive window
A new scar has active collagen remodelling beneath the surface. It may look closed, but it is still biologically unstable. Sun exposure during this stage can make the scar darker or more noticeable, especially in patients with medium to deeper skin tones.
Health Canada recommends sun-safety measures such as protective clothing, shade, and broad-spectrum sunscreen for UV protection. For an arm lift scar, clothing is often more reliable than sunscreen alone because it reduces repeated direct exposure throughout the day.
Practical scar protection usually includes:
- Keeping the scar covered during peak UV hours
- Using broad-spectrum sunscreen once the incision is fully healed and cleared
- Avoiding tanning beds completely during scar maturation
- Choosing UPF-rated sleeves or lightweight cover-ups in summer
- Reapplying sunscreen after sweating or swimming
Sun protection should be consistent even on cloudy days. UV still reaches the skin when the sky looks dull. This is especially easy to forget during spring and early fall, when the weather feels mild but UV exposure can still affect a healing scar.
Summer wardrobe planning
Many Canadian patients time arm lift surgery for late fall or winter. This allows the early scar stage to occur under sweaters, jackets, and long sleeves. By the time summer arrives, the scar may already be flatter and less reactive.
Timing is not always possible. Some patients need surgery around work schedules, child-care responsibilities, or travel availability. If surgery happens in spring or early summer, wardrobe planning becomes part of scar care.
Loose, breathable fabrics are usually easier on healing incisions than tight synthetic sleeves. Friction can irritate the scar, particularly in the first few months. Patients should avoid sleeves that rub directly along the inner arm incision during walking, driving, or exercise.
Canadian Callout: Seasonal clothing strategy
If you live in Toronto, Montreal, Calgary, or Ottawa, winter recovery can make scar concealment simpler because long sleeves are normal. In Vancouver or coastal British Columbia, where lighter clothing is common for more of the year, choose soft long-sleeve layers and UPF garments during the early maturation window.
When you can confidently wear short sleeves again
Most patients can wear short sleeves before the scar is fully mature. The question is not whether it is medically allowed. The question is whether the patient feels comfortable with the scar being seen.
At Month 1, the scar may still be pink, firm, or obvious. At Month 3, many patients feel more confident in casual short sleeves, especially if the scar sits on the inner arm. At Month 6, the scar is often calmer. By Month 12, many patients consider it socially manageable or discreet.
Confidence varies. Some patients wear sleeveless clothing early and do not worry about the incision line. Others prefer gradual exposure. Both responses are normal.
The best approach is practical: try different clothing at home before social events. Raise your arms, turn sideways, and check how the scar appears in natural light. This helps you decide when you are ready for short sleeves, gym wear, or swimwear.
When Scar Revision Becomes an Option?
Most arm lift scars improve with time, silicone care, sun avoidance, and appropriate follow-up. A scar that looks red at 3 months may look much softer by 12 months. That is why arm lift scar revision should not be rushed.
Still, some scars do not mature ideally. They may widen, remain raised, become itchy, darken significantly, or develop tethering. In those cases, revision or energy-based treatment may be considered after the scar has had enough time to declare its final behaviour.
Indicators that primary scar care has plateaued
A plateau means the scar has stopped improving despite consistent care. This is easier to judge after 9 to 12 months than in the early healing phase. Before that point, many scars are still changing.
Signs that deserve review include persistent thickness, widening, discomfort, itchiness, dark pigmentation, or a scar that pulls when the arm moves. Patients with a history of keloid or hypertrophic scarring should mention it early, not after the scar becomes difficult to manage.
Photo follow-up is useful. Taking photos in the same lighting every 4 to 6 weeks helps patients and surgeons see whether the scar is truly plateauing or simply maturing slowly. AKM’s virtual follow-up structure can help Canadian patients share progress photos after returning home.
Canadian Callout: Dermatology continuity after returning home
Canadian patients can continue scar care with a local dermatologist, family physician, or qualified scar-care provider once they are back home. This is especially helpful for patients with previous hypertrophic scars, keloid tendency, or pigment changes that need ongoing monitoring.
Surgical scar revision technique
Surgical scar revision removes the old scar and re-closes the tissue under improved conditions. This can help when a scar is widened, poorly positioned, tethered, or irregular. It cannot erase the scar completely.
The surgeon’s goal is to replace a poor scar with a better one. That may mean reducing tension, changing the closure pattern, trimming irregular scar tissue, or combining revision with silicone, LLLT, or laser-based aftercare. The new scar still needs time to mature.
Revision is usually considered only after the original scar has matured enough to assess fairly. For cross-procedural revision principles, see for cross-procedural scar revision options, see our broader scar revision guide. Arm lift-specific review should still be based on brachioplasty anatomy.
When LLLT or fractional laser is enough
Not every scar concern needs surgery. Redness, mild thickness, texture irregularity, or early firmness may improve with non-surgical treatments. LLLT, fractional laser, vascular laser, steroid injection, or silicone therapy may be enough depending on the scar pattern.
Laser treatment should be timed carefully. Treating too early can irritate a healing scar. Treating too late may miss the most responsive window for redness or texture changes. The right plan depends on scar type, skin tone, and medical history.
Patients with deeper skin tones should ask about pigment risk before laser treatment. Not every device suits every skin type. This is where Canadian dermatology follow-up can be useful, especially if you live in a major metro with access to scar-focused laser providers.
The main principle is simple. If the scar is still improving, keep supporting it. If it has stopped improving and remains functionally or cosmetically troubling, ask for a structured scar assessment before deciding on revision.
Before the FAQ, one scar-care reminder matters for Canadian patients: UV exposure can affect a healing scar long after the incision looks closed. Health Canada’s sun safety guidance supports protective clothing, shade, and sunscreen as practical tools for reducing UV exposure during scar maturation.
Frequently Asked Questions: Arm Lift Scar
Arm lift scar questions are rarely cosmetic only. They usually involve clothing, work, dating, fitness, summer plans, and confidence in social settings. These answers address the most common concerns Canadian patients raise before choosing brachioplasty.
How visible will my arm lift scar be at 1 year?
At 1 year, many arm lift scars are flatter, softer, and lighter than they were in the first few months. They do not disappear. A mature scar may still be visible at close range, especially when the arm is raised.
Visibility depends on incision placement, skin tone, scar tendency, sun exposure, and how consistently aftercare was followed. Inner arm scars are often less noticeable when the arms rest naturally at the sides. They may still be visible during movement or sleeveless activities.
Patients with a history of hypertrophic or keloid scars should expect a more cautious scar plan. That may include longer silicone use, earlier dermatology input, or more structured follow-up once back in Canada.
When can I wear short-sleeve clothing?
Medically, many patients can wear short sleeves once the incision is fully closed and no longer needs protective dressings. Socially, the timing varies. Some patients are comfortable earlier; others prefer to wait until the scar is less red.
Month 3 is often a turning point for casual short sleeves. Month 6 usually feels easier for many patients. By Month 12, the scar is typically much less active and easier to manage in normal clothing.
If you plan surgery in winter, the early scar period may happen under long sleeves. This is one reason Canadian patients often prefer fall or winter scheduling when possible.
Does Canadian dermatologist follow-up matter?
It can matter, especially for patients with raised scars, darker pigmentation, keloid tendency, or persistent redness. AKM Clinic can monitor your healing virtually, but local scar care can be useful once you return home.
A Canadian dermatologist may recommend silicone, steroid injections, vascular laser, fractional laser, or pigment-focused care depending on the scar pattern. The key is coordination. Your local provider should know when surgery happened, what closure method was used, and what products you have already tried.
Patients who want a broader view of the clinic’s medical model can also review AKM Clinic’s clinical team before scheduling surgery. Scar planning should be part of the consultation, not an afterthought.
Can scar revision fully eliminate the scar?
No. Scar revision cannot fully eliminate a scar. It can replace a poor scar with a better-positioned, narrower, flatter, or more even scar.
This distinction matters. A widened or irregular scar may improve with revision, but the body still forms a new healing line. That new scar must go through its own maturation period.
For arm lift patients, revision decisions are usually delayed until the scar has matured enough to judge fairly. In many cases, that means waiting close to 12 months unless there is a functional problem or wound issue.
What if I develop a keloid scar?
A keloid scar grows beyond the original incision line. It may feel firm, raised, itchy, or tender. Some patients are genetically more prone to keloids, and the risk can be higher in certain skin types.
If you have had keloids before, tell your surgeon during the first consultation. This does not always mean you cannot have an arm lift, but it changes the scar-risk discussion.
Management may include silicone, steroid injection, pressure therapy, laser, or specialist dermatology care. Keloid-prone patients should not wait until the scar is large or painful before asking for support.
When can I have my arm scar lasered?
Laser timing depends on the scar and the device. Redness, pigmentation, thickness, and texture are different problems. They do not all respond to the same treatment.
Some laser treatments can begin once the incision is fully healed and the surgeon or dermatologist confirms it is safe. Others are better delayed until the scar is more mature. Skin tone also matters because some lasers can trigger pigment changes.
If you are considering laser treatment in Canada, ask whether the provider has experience with post-brachioplasty scars. A scar on the moving upper arm behaves differently from a small facial scar.
How is the scar concealed during dating or social life?
Concealment is usually a combination of timing, clothing, and confidence. In the early months, soft long sleeves or light layering can reduce attention while the scar is still red. By Month 6, many patients feel more comfortable in short sleeves.
For dating, fitness classes, or social events, test outfits at home first. Raise your arms, turn sideways, and look at the scar in daylight. This gives you a realistic sense of visibility before you are in public.
Some patients choose to be open about the scar. Others prefer privacy. Both choices are valid. The main goal is to understand the trade-off before surgery so the scar does not feel like a surprise later.
Where can I review arm lift cost details?
This article is focused on scar placement and healing, not pricing. Still, cost can affect planning, especially for Canadian patients comparing procedure timing, travel, and recovery logistics.
For procedure-specific information, review arm lift pricing in CAD. Keep scar care in mind when comparing quotes. A cheaper plan that does not include proper follow-up, wound care, or scar support may not be the better value.
Considering an arm lift? Ask about scar placement, incision length, LLLT support, silicone timing, and your 12-month scar-care plan during consultation. A good result starts with a clear scar strategy.
Medical Disclaimer: This page is provided for general educational purposes only and does not replace an in-person medical consultation, diagnosis, or personalized treatment plan. All surgery carries risks, and outcomes vary between individuals. Suitability for an arm lift (Brachioplasty) surgery, procedure selection, and anesthesia choice can only be determined after a full clinical assessment by a qualified surgeon. Always follow your clinician’s instructions and seek urgent medical attention if you develop concerning symptoms during recovery.


