If you’re researching an arm lift scar, you’re not alone—and you’re not being “vain.” For many patients, the real question isn’t whether a scar exists (it will), but whether it can be placed, supported, and matured so it becomes far less noticeable over time. This article zooms specifically into scar biology, healing phases, and aftercare. The procedure-level scope—candidacy criteria, mini vs. standard vs. extended decision logic, and what brachioplasty actually delivers as a contour result—belongs on a dedicated page.
The full procedural breakdown: brachioplasty procedural overview.
Key takeaway: The goal is not “no scar.” The goal is a thin, well-positioned scar that fades predictably—so hiding it becomes easy in real life.
Table of Contents
What an Arm Lift Scar Really Is (and Why It’s Not “One Scar Fits All”)
An arm lift scar is the body’s natural “repair line” after brachioplasty (arm lift surgery). Scar quality varies widely because scar formation is influenced by skin thickness, tension, circulation, inflammation, and your personal healing tendencies. In scientific research and clinical practice, scarring is understood as a long remodeling process—not a quick cosmetic “finish.” That’s why two patients can have the same procedure and very different scar outcomes.
The goal: a thinner, well-placed scar—not a “scar-free” promise
You may see marketing phrases like scar invisible arm lift surgery. In reality, “invisible” is not a medically reliable promise. What skilled surgeons aim for is a scar that is strategically placed (typically on the inner arm where it’s less visible), closed with minimal tension, and supported with a clear aftercare protocol—so it matures into a fine line over time.
Why arm skin behaves differently than face scars
Arms move constantly, and the inner upper arm skin can be thinner and more prone to tension. That tension can contribute to scar widening if not managed properly. This is why compression, controlled movement, and a surgeon’s closure technique matter so much for arm lift scars—especially in the first 6–12 weeks when the body is laying down new collagen.
Your anatomy & history: genetics, skin tone, prior scars, weight loss
Your baseline scarring tendency (including family history of thick or raised scars), skin tone (risk of longer-lasting pigmentation changes), and major weight loss history can all influence scar appearance. If you’ve formed hypertrophic scars or keloids before, you’re not automatically “ruled out,” but you may need a stricter prevention plan.
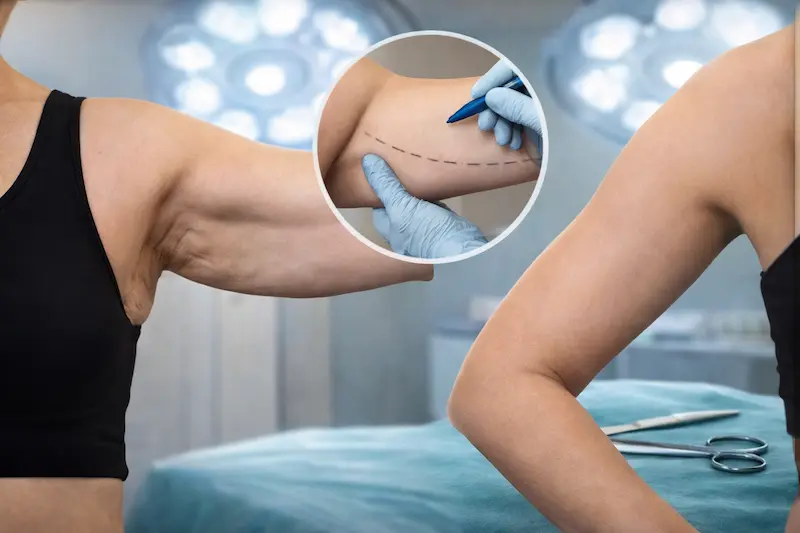
Where the Incision Is Placed (So It Can Be Hidden)
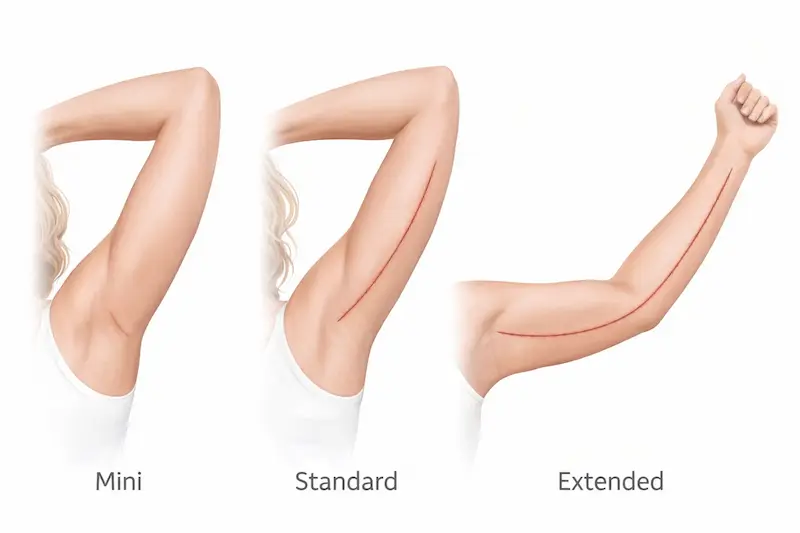
Incision placement is the first “scar-hiding strategy”—because the best scar is the one that sits where your natural arm position, clothing, and shadow lines already conceal it. The type of arm lift you need determines how long the incision must be. Understanding the difference between a mini arm lift scar and an extended arm lift scar helps set realistic expectations and prevents disappointment later.
Mini arm lift: scar limited to the armpit crease
A mini arm lift is designed for mild laxity close to the armpit. The incision is usually short and placed in the armpit fold, creating an arm lift armpit scar (also described as an arm lift scar under armpit). This can be easier to hide with arms down, but it is not ideal if you have significant loose skin along the upper arm.
Standard brachioplasty: inner-arm scar from armpit toward elbow
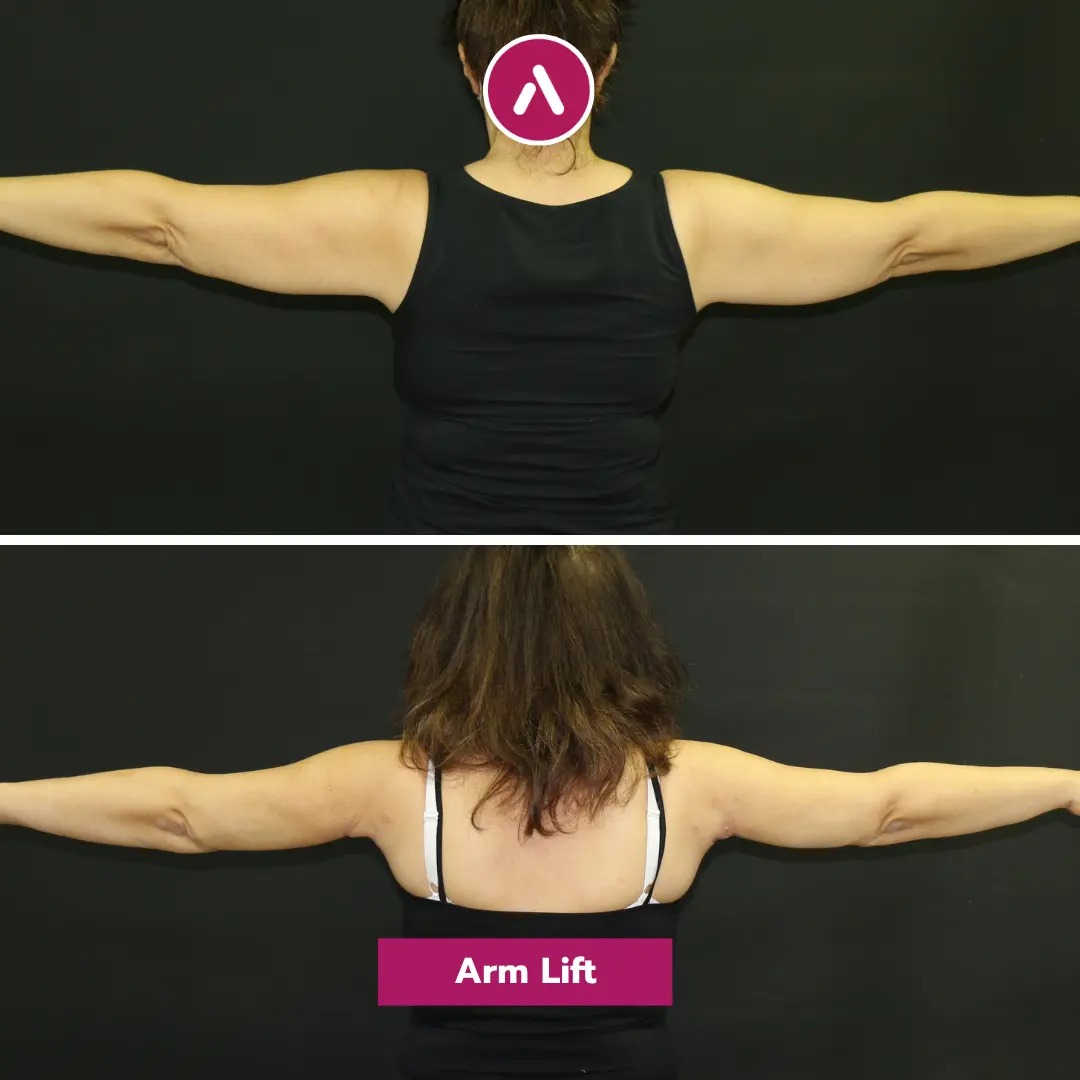
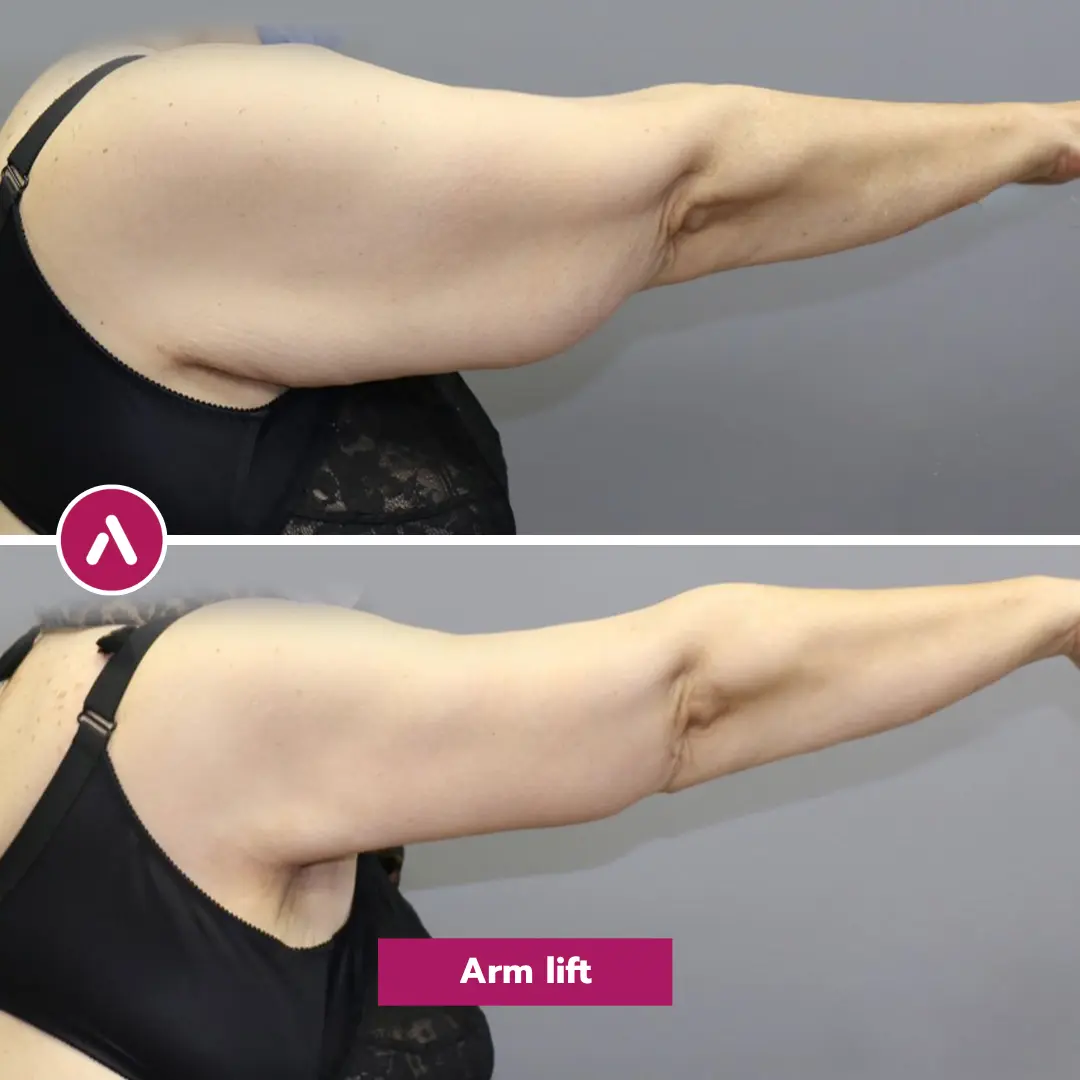
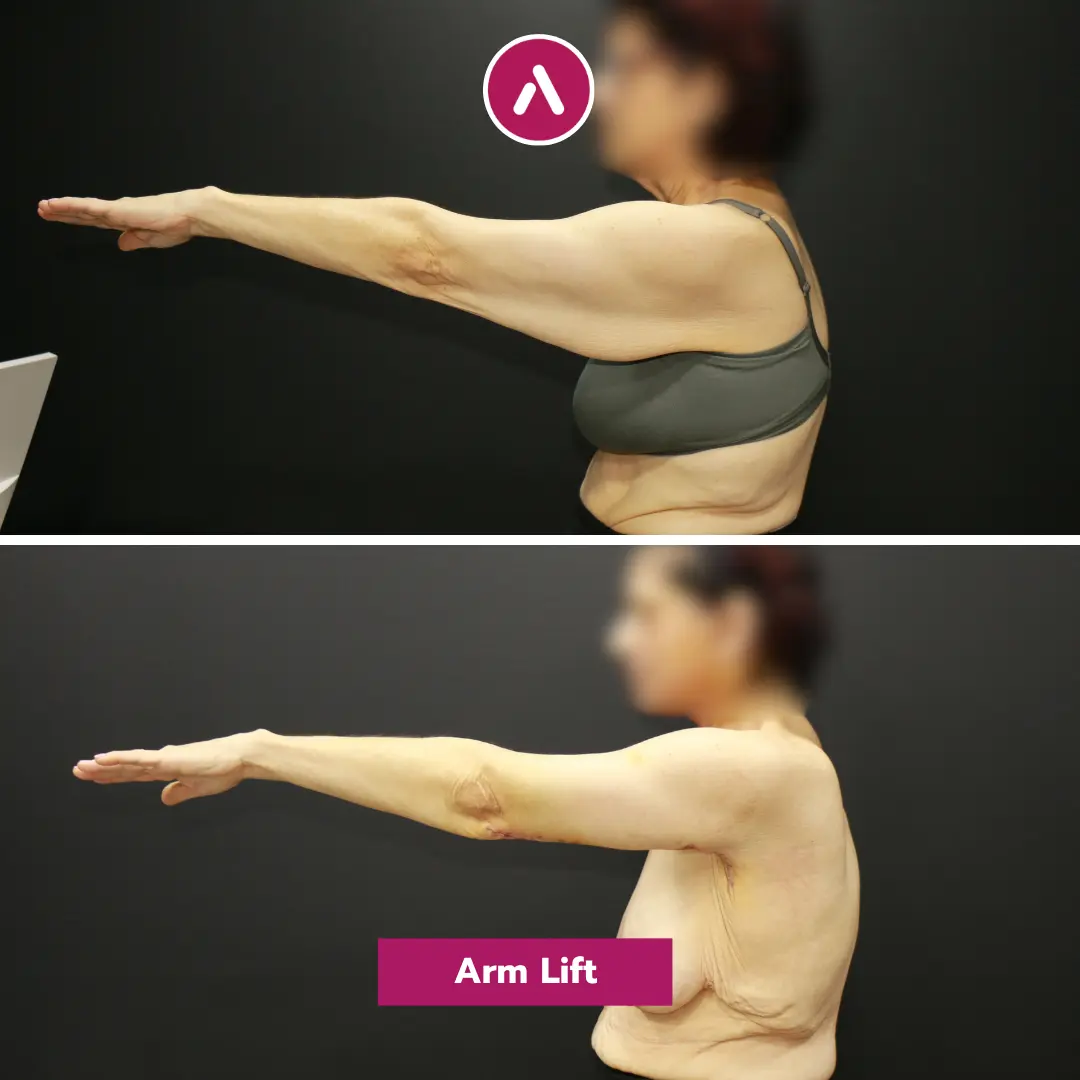
This is the most common pattern for moderate-to-severe upper arm laxity. The incision typically runs along the inner upper arm so it’s less visible from the front or back when your arms rest naturally. In well-planned cases, most patients find that the scar is easier to conceal than the loose skin they started with—especially after the scar matures.
Extended arm lift: when the scar may continue to the side chest
An extended arm lift scar may be necessary when loose skin extends beyond the upper arm into the lateral chest wall. While longer, the trade-off is a more complete contour improvement. If your skin laxity truly extends, choosing a shorter scar can leave “leftover” tissue and an uneven result—so scar length is sometimes the price of a smoother silhouette.
“Best placement” principles: inner-arm vs. posterior placement trade-offs
Most surgeons prefer inner-arm placement because it’s less visible in everyday posture. Posterior placement may be considered in select anatomies, but it can show more when viewed from behind. A scar-conscious plan considers how you stand, how you dress, and how you move—because “hidden” is not just anatomy; it’s lifestyle.
“4-5 day stay” has its own logistical reality: airport-to-clinic-to-hotel handover, post-op room comfort that supports compression-garment sleep, and proximity that reduces travel time during the early scar-protection window. The accommodation choice shapes the recovery experience more than most patients expect—especially in the first 72 hours when reduced activity and incision protection are non-negotiable.
The full curated hotel and transfer structure: Istanbul recovery accommodation reference.
Arm Lift Scar Healing Timeline (Week-by-Week Expectations)
Scar healing is not linear—and it’s not quick. What you see early on is rarely what you’ll see at the one-year mark. In medical science, scar formation is described as a phased process (inflammation, proliferation, remodeling). That’s why patients often worry at weeks 4–8 (when scars can look thicker or redder) even though this can be a normal stage on the way to a flatter, lighter scar. Understanding the timeline helps you avoid unnecessary panic and make smarter choices that protect your result—especially if you’re tracking your arm lift scar after 1 year expectations.
Days 1–14: incision protection, swelling, and the “early healing” phase
In the first two weeks, your incision is still fragile. Swelling, bruising, tightness, and a pink/red line are common. Your job here is simple: keep the incision clean as instructed, avoid tension (overreaching, heavy lifting), and protect the area from friction. This period matters because early wound irritation can increase inflammation—one of the drivers of thicker scars.
Weeks 3–8: scar thickening/itching—often normal remodeling
Many patients are surprised that the scar can look “worse” before it looks better. Around weeks 3–8, the body is producing collagen rapidly, and scars can become raised, firm, itchy, or more noticeable. This doesn’t automatically mean you’re developing a permanent thick scar. It means your skin is actively remodeling. If you have a mini arm lift scar (usually in the armpit crease), friction from arm movement and sweating can make this stage feel more sensitive—so consistent aftercare becomes even more important.
Months 3–6: fading starts, texture improves
For many patients, the scar begins to soften and lighten in this window. Redness typically reduces, and the scar’s edges look less “sharp.” This is often when silicone routines and gentle scar massage (if approved by your surgeon) show visible benefits. If you’re comparing photos, use consistent lighting and angles—scar color can look dramatically different depending on shadows and camera exposure.
Months 12–18: mature scar stage (what “final” usually means)
When patients search arm lift scar after 1 year or 1 year arm lift scar, they’re usually looking for reassurance that the scar won’t stay bright or thick forever. In many cases, the one-year scar is significantly flatter and lighter than the 2–3 month scar. But “final” maturity can take 12–18 months (sometimes longer). At the one-year point, it’s reasonable to assess whether the scar is simply still maturing—or whether it’s behaving like a hypertrophic scar and might benefit from targeted treatment.
| Time Point | What You May See | What Usually Helps Most |
|---|---|---|
| 0–2 weeks | Swelling, pink/red line, sensitivity | Protection, low tension, clean wound care |
| 3–8 weeks | Thickening, itching, more redness | Compression (if advised), silicone, friction control |
| 3–6 months | Softening, gradual fading | Silicone + massage (if cleared), UV protection |
| 12–18 months | Mature scar: flatter, lighter, more “blend-in” | Evaluate for treatments if raised/dark persists |
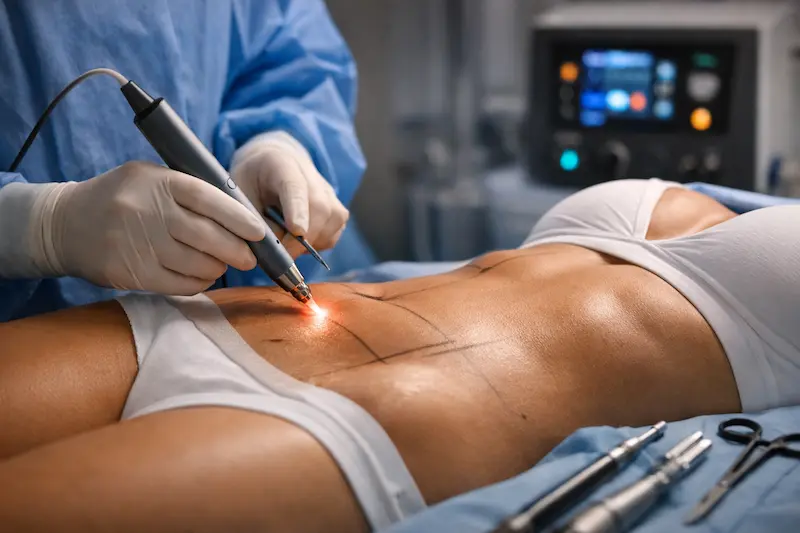
The Surgeon-Controlled Factors That Make Scars Less Visible
Scar outcomes aren’t only about creams. A significant portion of scar quality is “built in” during surgery: incision design, tissue handling, bleeding control, tension management, and layered closure. This is why scientific research consistently emphasizes that minimizing mechanical tension and optimizing wound stability are key elements in scar management. In other words: great aftercare matters—but the foundation is surgical technique.

Tension-free closure: why technique matters more than creams
“Tension-free closure” is the surgical principle most directly tied to scar quality, and the evidence base behind it has matured into prospective, controlled data—not just expert consensus. An October 2025 prospective trial in Clinical, Cosmetic and Investigational Dermatology randomized 50 patients undergoing high-tension flap surgery to standard closure vs. dermal super-tension-reducing sutures: tension-reducing suture trial. The intervention group showed reduced incision tension and improved scar appearance scores—mechanism evidence for why surgical layered closure changes scar maturation outcomes.
Important caveat: this trial studied flap surgery (latissimus dorsi, anterolateral thigh, free fibula), not brachioplasty specifically. The tension-biology mechanism transfers reasonably to upper-arm closures—where mobility and skin thinness create similar tension challenges—but procedure-specific RCT evidence for brachioplasty remains a separate research need.
Symmetry & incision mapping: designing the scar for your wardrobe
Good incision planning considers where the scar will sit when your arms are down, what clothing you wear most, and how your arm rotates naturally. For example, many patients want the scar positioned where it’s least visible in short sleeves. In a mini approach, that often means an arm lift scar under armpit (an arm lift armpit scar)—but only if your skin laxity pattern truly fits that technique.
Managing “dog ears” and contour transitions to avoid revision
Small puckers at the ends of an incision (“dog ears”) can happen when tissue removal doesn’t match skin redundancy. A scar-conscious approach anticipates these transitions. Proper shaping reduces the chance you’ll need revision later, and it improves how confidently you can pose your arms in photos without drawing attention to the incision line.
When combining with liposuction helps—and when it can hurt skin quality
In some cases, liposuction can improve contour and reduce bulk—potentially allowing a cleaner drape of skin. But aggressive liposuction can compromise blood supply and increase healing stress, especially in already-thin skin. The safest approach is individualized: the goal is smooth contour and healthy tissue conditions for scar maturation.
“Adding lipo” sounds harmless until you look at blood supply geometry. Aggressive liposuction in the upper arm can compromise skin perfusion—precisely where you need healthy tissue conditions for clean scar maturation. The integration question isn’t binary. It’s a layered call about fat distribution, skin quality, and how much disruption the dermal-subdermal interface can tolerate without trading contour for healing complications.
The full liposuction decision logic across procedure types: liposuction adjunct decision logic.
Reality check: The best scar strategy is a chain: smart incision placement + tension control + disciplined aftercare + UV protection. Break one link, and the scar has a higher chance of staying noticeable.
The Patient Scar-Care Plan (What to Do, and What to Avoid)
Even with an excellent surgical closure, your daily habits can determine whether arm lift scars mature into a thin line—or stay irritated, darker, and wider. From a medical science perspective, scar care is about controlling three things: tension (pulling on the incision), inflammation (irritation and swelling), and UV exposure (which can “lock in” pigmentation). Below is a practical plan you can actually follow—especially helpful if your scar is in a high-friction area such as an arm lift scar under armpit (also called an arm lift armpit scar).
First 2 weeks: wound care rules that prevent widening
This phase is about protecting the incision like a fresh seam. Follow your surgeon’s instructions exactly, and avoid “testing” your range of motion. Overhead reaching, lifting, and repetitive arm motions can pull on the incision and increase the risk of scar widening. If your procedure involved an armpit crease incision (common with a mini arm lift scar), moisture and friction can be higher—so keeping the area dry and protected becomes even more important.
- Do: Keep dressings as directed, protect the incision from rubbing, and sleep in a position that avoids stretching the arms.
- Don’t: Scrub the incision, apply random ointments not approved by your surgeon, or resume workouts “because you feel fine.”
Weeks 2–12: silicone + massage + compression (a practical schedule)
Once your surgeon confirms the incision is fully closed, silicone-based therapy is one of the most widely used, evidence-informed tools for scar management. Gentle scar massage (only when cleared) can help soften tissue as collagen remodels. Compression garments (when prescribed) can reduce swelling and mechanical stress—both linked to better scar behavior in scar science discussions.
The scar care framework—silicone, compression, massage, UV protection—maps across procedures, but the specific friction zones differ dramatically. An armpit-crease scar lives in moisture and movement; a low abdominal scar lives under waistband pressure. Reading both side by side reveals which steps are universal scar biology and which are anatomy-specific tactical adjustments.
The parallel framework with abdominal-specific timing rules: scar care comparative protocol.
“Gentle scar massage” and “manual lymphatic drainage” get conflated in patient discussions. They’re not the same technique—and timing rules differ. Drainage works on lymphatic flow upstream of the scar; scar massage works on the tissue interface itself. Mixing the two too aggressively, especially before the incision is fully closed, can prolong inflammation in zones where the goal is calm remodeling.
The drainage-specific timing protocol: manual drainage timing principles.
| Time Frame | What to Focus On | Simple Routine (If Your Surgeon Approves) |
|---|---|---|
| Weeks 2–6 | Stability + low irritation | Silicone gel/sheets daily; wear compression as instructed; avoid friction (especially armpit crease). |
| Weeks 6–12 | Remodeling support | Continue silicone; add gentle massage 1–2x/day if cleared; gradually increase safe movement. |
| 3–6 months | Fade + soften | Keep silicone if beneficial; prioritize UV protection; reassess if scar stays raised or itchy. |
Sun & UV: the #1 reason scars stay darker longer
UV exposure can prolong redness and trigger hyperpigmentation—especially in the first year. If you’re comparing arm lift scar after 1 year photos online, remember: two scars can look completely different depending on sun habits. Protect the area with clothing and, once allowed, sunscreen. This matters even if the scar is “hidden,” because incidental sun exposure adds up.
Lifestyle: nicotine, nutrition, hydration, sleep, and safe movement
Nicotine is a major enemy of scar quality because it reduces blood flow and impairs healing. Good protein intake, hydration, and adequate sleep support the body’s collagen remodeling. Also: moving “smart” is better than moving “hard.” Controlled mobility protects the incision while preventing stiffness.
- Nicotine: Avoid before and after surgery as advised—this is one of the biggest controllable risk factors for poor scar healing.
- Nutrition: Prioritize protein and balanced meals to support tissue repair.
- Movement: Follow your surgeon’s timeline; sudden stretching can turn a thin scar into a widened one.
Friction management for armpit-area scars (mini and armpit incisions)
If you have an arm lift scar under armpit, friction and moisture can be the hidden “scar irritators.” This is a common reason a mini arm lift scar can feel more sensitive early on. The solution is not aggressive cleaning or harsh products—it’s prevention: reducing rubbing, keeping the area dry, and following a surgeon-approved silicone plan once the skin is ready.
Optional recovery technologies that may support swelling and scar quality (clinic-dependent)
Some clinics integrate recovery-support technologies as part of a structured aftercare pathway. For example, AKM Clinic highlights Hyperbaric Oxygen Therapy (HBOT) and Low-Level Laser Therapy (LLLT) as post-operative recovery options designed to support tissue oxygenation, reduce swelling, and promote healthier healing dynamics. These modalities are not a “scar eraser,” but they may help create a better healing environment—especially in patients focused on minimizing downtime and optimizing scar maturation.
“Recovery technologies” is a phrase that gets used loosely. The substance behind HBOT and LLLT is mechanism-specific: pressurized oxygen delivery for tissues with compromised perfusion, and specific wavelengths that influence inflammation modulation and collagen behavior. Whether these adjuncts add real value to scar quality depends on how they’re integrated into a documented post-op pathway—not whether the equipment exists in the building.
The full technology and accreditation reference: recovery technology infrastructure.
HBOT comes up in plastic surgery marketing as a “boost”—a framing that obscures the actual mechanism. Pressurized oxygen dissolves directly into plasma, bypassing the hemoglobin transport bottleneck and reaching tissues with compromised microcirculation. For brachioplasty scars specifically, the relevance sits in the early-weeks window when bruising and tension can slow perfusion exactly where you need calm healing.
The full mechanism with realistic outcome boundaries: pressurized oxygen mechanism explained.
LLLT shows up in scar discussions with two opposite framings—”miracle laser” or “marketing fluff.” The accurate position sits in between: specific wavelengths influence cellular activity in ways that have measurable mechanism support, but the realistic delta is incremental, not transformational. For brachioplasty scars where the surgical foundation is already strong, LLLT becomes one tool among several—useful for inflammation modulation and collagen behavior, not a substitute for tension control or UV discipline.
The full mechanism integrated into post-surgical scar care: LLLT scar minimization guide.
Patient mindset that works: You’re not “treating a line.” You’re supporting a biological process—calm, consistent care over months is what turns a noticeable incision into a quietly fading scar.
How to Hide an Arm Lift Scar in Real Life (Clothes, Events, Photos)
Once you understand where your incision sits and how scars mature, “hiding” becomes a practical lifestyle question: what you wear, how you pose, and how you time major events. Many patients who worry about arm lift scars discover that the scar becomes easier to conceal than expected—especially when it’s placed along the inner arm or within an armpit crease. This section focuses on realistic, day-to-day strategies that work for different incision patterns, including a mini arm lift scar, an extended arm lift scar, and an arm lift scar under armpit (an arm lift armpit scar).
Clothing strategy: sleeve lengths, fabrics, and arm positions
Clothing is your simplest “scar camouflage,” and it doesn’t have to feel restrictive. If your scar is along the inner arm, it’s often naturally hidden when your arms are down. If your incision is in the armpit crease (mini approach), sleeveless tops may still be fine, but you’ll want to avoid tight armholes that rub the area—especially early on.
- Best early choices: soft fabrics, looser armholes, light layers, and breathable materials to reduce friction.
- For inner-arm scars: cap sleeves, flutter sleeves, and relaxed short sleeves often hide the scar in a natural stance.
- For armpit scars: avoid stiff seams and tight underarm cuts that can irritate an arm lift scar under armpit.
Makeup & camouflage: when it’s safe and what works best
Camouflage makeup can help for events, but timing matters. Do not apply makeup to an incision that hasn’t fully healed. Once your surgeon confirms the skin is intact and stable, specialized body concealers can be used for redness or color mismatch. Keep expectations realistic: makeup can neutralize color, but it won’t fully hide texture if a scar is raised.
- When it’s most effective: for pink/red scars that have healed but are still visibly colored.
- When to be cautious: if the area is still sensitive, itchy, or prone to friction (common with arm lift armpit scar locations).
Social confidence: weddings, vacations, beach days—timing tips
If you have a major event, timing your surgery and recovery window is one of the smartest confidence strategies. Many patients feel significantly more comfortable by 3–6 months, but the most dramatic “blend-in” improvement often continues up to the arm lift scar after 1 year mark and beyond. If your event includes strong sun exposure (vacations, pool days), it’s essential to plan for UV protection because sun can keep scars darker longer.
| Scenario | Best Strategy | Scar Risk to Avoid |
|---|---|---|
| Wedding / formal photos | Choose sleeves or shawl options; consider body concealer only when cleared | Rushing “cover” products too early |
| Beach / vacation | UV-protective cover-ups; avoid direct sun on scar | Hyperpigmentation from sun exposure |
| Gym & fitness return | Follow the surgeon’s timeline; gradual progression | Scar widening from early tension |
How to pose for photos so the scar is less noticeable
For inner-arm scars, a slight rotation of the arm can either reveal or conceal the incision line. In photos, small adjustments often make a big difference—especially before the 1 year arm lift scar maturity stage. If you want discretion in early months, keeping arms relaxed and slightly closer to the torso usually hides the inner arm surface better than wide, extended poses.
- More concealing: arms down, relaxed shoulders, slight inward rotation.
- More revealing: arms raised, elbows flared outward, strong overhead poses (also not advised early post-op).
Tattoos & cover-ups: when it’s safe (and when it’s a mistake)
Tattoos are sometimes considered for scar concealment, but they are not a quick fix. Scar tissue behaves differently than normal skin—ink may heal unpredictably, and tattooing too early can worsen irritation. If you’re thinking about tattoos, it’s usually best to wait until your scar is mature (often around 12–18 months) and stable, and only after discussing it with a qualified professional and your surgical team.
In many cases, patients find they no longer feel the need for tattoos once the scar reaches the arm lift scar after 1 year stage and continues fading.
Confidence tip: Most people won’t notice your scar the way you do. The best “hide” strategy is often a combination of mature healing (time) + smart wardrobe + sun protection.
If Your Arm Lift Scar Is Thick, Raised, or Dark (Solutions That Actually Help)
Even with excellent surgery and careful aftercare, some arm lift scars become more noticeable than expected—raised, firm, itchy, or darker than the surrounding skin. This is not automatically a “bad surgery” sign; it often reflects how your body responds to inflammation and tension during healing. The good news is that modern scar management has multiple options. The key is timing: what helps at 6 weeks is different from what helps at the arm lift scar after 1 year stage (or when you’re evaluating a 1 year arm lift scar that still looks prominent).
The scar care framework—silicone, compression, massage, UV protection—maps across procedures, but the specific friction zones differ dramatically. An armpit-crease scar lives in moisture and movement; a low abdominal scar lives under waistband pressure. Reading both side by side reveals which steps are universal scar biology and which are anatomy-specific tactical adjustments.
The parallel framework with abdominal-specific timing rules: scar care comparative protocol.
Hypertrophic scars vs. keloids: how to tell the difference
These two are often confused, but they behave differently:
- Hypertrophic scar: raised/thick but stays within the original incision line. Often improves gradually with time and treatment.
- Keloid: grows beyond the original incision borders and can keep expanding. More common in certain genetic backgrounds and body areas, and needs a more proactive plan.
If you have an arm lift armpit scar (or arm lift scar under armpit), remember that friction and moisture can exaggerate redness and irritation—sometimes mimicking “worsening,” even when the scar is still in a normal remodeling phase.
What “normal” can still look like at 3–6 months
Many patients search photos online and expect the scar to be faint by month three. But scar remodeling can remain active for 12–18 months. A scar that is pink and slightly firm at 3–6 months can still mature beautifully. This is why comparing your current scar to true arm lift scar after 1 year examples is more meaningful than comparing to early post-op pictures.
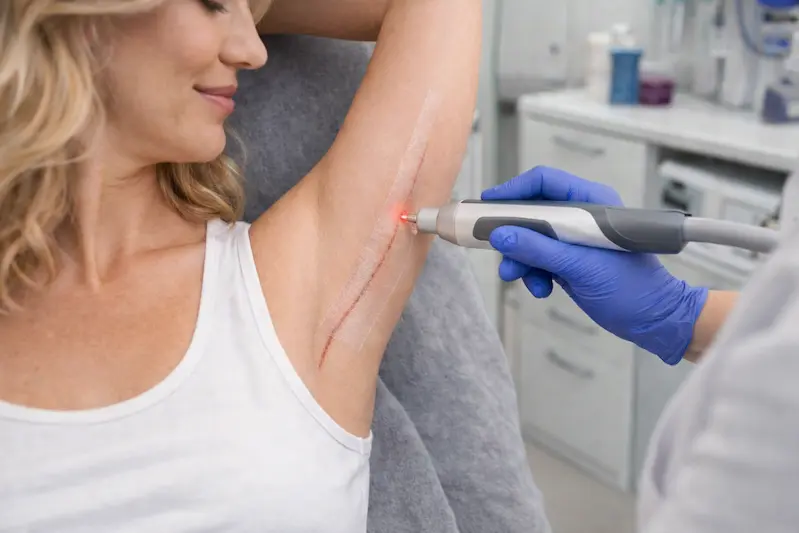
In-office options: laser, microneedling, steroid injections—who benefits
If a scar is persistently raised, itchy, or thickening beyond the expected window, in-office treatments can help. Your surgeon (or a scar specialist) typically chooses based on scar type, location, and color:
- Steroid injections: often used for raised, hypertrophic scars (and some keloids) to flatten and soften tissue.
- Laser treatments: commonly used for redness and pigment issues; may also help texture depending on the device and scar maturity.
- Microneedling / resurfacing: sometimes used later in healing to improve texture and blending (timing matters—too early can irritate).
For a mini arm lift scar in the armpit crease, the plan often prioritizes irritation control first (friction, sweat, tight clothing) before advanced interventions—because ongoing irritation can undermine treatment results.
Topicals that can help—and the ones that usually don’t
Patients often try dozens of creams, but scar care works best when it’s simple and consistent. Silicone remains one of the most commonly recommended options once the incision is fully closed. Strong acids, harsh exfoliants, and “miracle oils” can irritate healing tissue—especially for an arm lift scar under armpit where skin is sensitive.
| Problem | What It Often Looks Like | What Typically Helps |
|---|---|---|
| Persistent redness | Pink/red scar beyond early months | UV protection, silicone, surgeon-guided laser options |
| Raised/thick scar | Firm, elevated, sometimes itchy | Silicone + massage (if cleared), steroid injections, pressure strategies |
| Dark pigmentation | Brown/gray discoloration | Strict UV avoidance, targeted pigment-safe treatments (provider-guided) |
| Widened scar | Flat but broader line | Prevent tension early; later: consider revision only if stable and bothersome |
Scar revision surgery: when it’s worth it and when it’s not
Revision is not the first step—it’s usually considered after the scar has matured (often closer to 12–18 months), especially if you’re unhappy with the 1 year arm lift scar appearance and it remains wide, irregular, or functionally uncomfortable. Revision can improve shape and thickness, but it still creates a new scar—so the decision should be based on realistic gains, not the hope of “no scar.”
Revision planning can differ by incision pattern. For example, an extended arm lift scar may need targeted refinement in specific segments (where tension is highest), while an armpit-crease scar may need friction and moisture control addressed first to prevent recurrence.
Red flags: infection, separation, persistent pain—when to contact your surgeon
Some signs should never be “waited out.” Contact your surgical team promptly if you notice:
- Increasing warmth, spreading redness, or worsening swelling
- Pus-like drainage or a bad odor
- Wound edges separating (opening)
- Fever or chills
- Persistent or escalating pain that doesn’t match your recovery stage
Practical truth: If a scar is still very noticeable at one year, that doesn’t mean you’re stuck with it. It means you’re at the right point to evaluate targeted, evidence-informed options—rather than guessing with random products.
Choosing a Scar-Conscious Arm Lift Team (Trust, Standards, Aftercare)
If your biggest fear is ending up with visible arm lift scars, the most protective decision you can make is choosing a team that treats scarring as a core outcome—not an afterthought. Scar quality depends on incision planning, tension management, and a structured follow-up system. This matters even more for patients traveling for surgery, where consistent guidance (especially during the first 6–12 weeks) can make the difference between a thin line and a widened scar.
Anesthesia choice has a quiet but real influence on the scar conversation. Local anesthesia approaches change inflammation patterns, swelling dynamics, and how early mobilization can begin—each of which feeds back into how the scar matures. For mild-to-moderate laxity cases that fit the awake protocol, the decision logic involves more than just preference: it touches scope tolerance, comfort sustainability, and physiological limits.
The full awake arm lift decision framework: awake arm lift candidacy guide.
What to ask in consultation: “How do you design the incision for my goals?”
Ask your surgeon to explain incision placement using your anatomy and lifestyle. The right plan for someone with mild laxity may be a mini arm lift scar in the armpit crease, while someone with major skin excess may need a longer inner-arm scar or an extended arm lift scar to achieve a smooth contour. Good surgeons can clearly explain the trade-offs and show where the incision will sit when your arms are down.
- “Where exactly will the scar sit when my arms rest naturally?”
- “Am I a true mini candidate, or would a short scar leave leftover loose skin?”
- “How do you reduce tension to prevent scar widening?”
How to evaluate before/after photos for scar realism (lighting, distance, maturity)
When reviewing before/after photos, look for scars photographed at multiple time points. A well-hidden early scar is not the same as a mature scar. Ideally, you want to see examples closer to the arm lift scar after 1 year stage (or at least several months out). If all photos are taken in dim lighting, from far away, or with arms positioned to hide the scar, ask for more realistic views.
- Check maturity: Are there results labeled 6–12+ months?
- Check posture: Do you see arms down and relaxed (real life)?
- Check incision type: Mini vs standard vs extended scars should be shown separately.
Photo evaluation skill is its own scar literacy. A scar photographed at 6 weeks under harsh lighting tells a very different story than the same scar at 12 months in natural light. Without time-stamped comparisons, “before/after” becomes marketing rather than evidence. Curated outcomes with multi-timepoint documentation give you a realistic baseline for what mature scars actually look like across mini, standard, and extended approaches.
The procedure-specific outcome reference: arm lift outcome library.
Aftercare system: remote follow-up, scar protocol, and accountability
A scar-care plan should be specific: when silicone starts, how long compression is used, what movements to avoid, and what “warning signs” mean you should contact the team. This is especially important for medical travel patients, who often worry about being “on their own” after returning home. One international patient described post-op support as a “lifeline of support” and noted, “I wrote again, and they answered me,” highlighting how responsiveness reduces anxiety and prevents small issues from escalating.
“Remote follow-up” sounds like a feature on a checklist until you’re 5,000 km from your surgical team and notice something you’re not sure about. The accountability structure—response time SLAs, escalation pathways, when video calls happen, when in-person revisits are scheduled—is what turns a marketing claim into actual support. For scar quality specifically, that responsiveness window matters most in the first 6-12 weeks when tension management and friction control determine how thin the line stays.
The full Istanbul travel and aftercare structure: international patient pathway.
Recovery support: swelling control strategies that indirectly help scars
Lower swelling and lower irritation generally support better scar behavior. Practical measures include proper compression (when prescribed), gradual mobility, and friction control—particularly if your incision is an arm lift scar under armpit (an arm lift armpit scar) where moisture and rubbing are common triggers. Some clinics also offer adjunct recovery options (such as HBOT and LLLT) to support the healing environment, but the essentials remain consistent aftercare and smart activity progression.
Reality check: If someone promises scar invisible arm lift surgery, treat it as marketing—not medicine. The honest goal is a scar that is predictably placed and well-managed, then allowed the time it needs to mature.
Frequently Asked Questions (FAQ): Arm Lift Scar
Below are the most common questions patients ask when comparing options and trying to set realistic expectations for arm lift scars—including what you can expect at the 1 year arm lift scar stage.
How long does an arm lift scar take to fade?
Most scars improve noticeably between 3–6 months, but maturity commonly continues to 12–18 months. Many patients see the biggest “blend-in” improvement by the arm lift scar after 1 year mark.
Can an arm lift be done with “no scar”?
No. Skin removal requires an incision. What matters is scar placement, tension control, and consistent aftercare—not the promise of “no scar.”
What’s the best scar cream after brachioplasty?
Once the incision is fully closed and your surgeon approves, silicone-based gel or sheets are commonly recommended. Avoid harsh products that irritate healing skin.
When can I start silicone sheets or gel?
Only after your surgeon confirms the incision is fully sealed (no open areas). Starting too early can trap moisture and irritate the wound—especially in an arm lift scar under armpit location.
Will my scar be visible when my arms are down?
If the incision is placed along the inner arm, it’s often less visible in a relaxed stance. A mini arm lift scar (armpit crease) can also be discreet, but it depends on clothing, arm movement, and how your tissue heals.
What if I form keloids—am I still a candidate?
You may still be a candidate, but you should discuss your scar history in detail. You may need a proactive prevention plan and closer follow-up, and your surgeon may adjust the approach based on risk.
Can I combine an arm lift with liposuction or other body procedures safely?
Sometimes, yes—but it depends on tissue quality, blood supply, and your overall surgical plan. Combined approaches can help contour, but overly aggressive liposuction may stress healing in some patients. Your surgeon should explain why it helps in your specific case.
Medical Disclaimer: This page is provided for general educational purposes only and does not replace a face-to-face medical consultation, diagnosis, or personalized treatment plan. All surgery carries risks and outcomes vary between individuals. Suitability for a arm lift scar, procedure selection, and anesthesia choice can only be determined after a full clinical assessment by a qualified surgeon. Always follow your clinician’s instructions and seek urgent medical attention if you develop concerning symptoms during recovery.