Washing hair after transplant is one of the most common “make-or-break” moments in hair transplant aftercare—because it’s the first time water, shampoo, and your hands come close to newly placed grafts.
This guide gives clear, practical hair transplant washing instructions you can follow at home (whether you had FUE or DHI). Keep in mind: every clinic may adjust timing slightly based on your skin type, graft count, and healing. When in doubt, always follow your surgeon’s plan.
Key takeaway: In the first 10–14 days, your job isn’t to “deep clean.” Your job is to keep the scalp hygienic while avoiding friction and pressure that can disturb grafts.
- Think “no rubbing.” Contact is allowed; friction is the enemy.
- Use gentle water flow. High pressure can irritate and increase swelling.
- Don’t pick scabs. Scabs should soften and lift gradually with the right routine.
Table of Contents
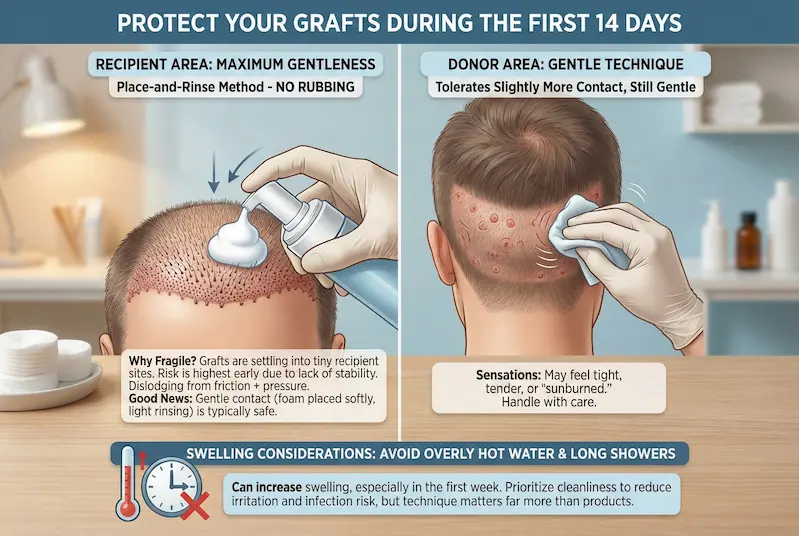
The #1 Rule: Protect Your Grafts During the First 14 Days
The first two weeks are the most delicate phase of your hair transplant recovery. Your grafts are settling into place, and your scalp is forming small protective crusts (scabs). You still need cleanliness to reduce irritation and infection risk—but the technique matters far more than the products.
Why grafts are fragile (and what “dislodging” really means)
Newly implanted follicles are placed into tiny recipient sites. In the early days, they’re held mainly by the body’s natural clotting and early healing response. This is why the “first hair wash after hair transplant” should never involve rubbing, scratching, or massaging.
- Dislodging usually comes from friction + pressure (rubbing with fingertips, towel friction, strong water jets).
- Risk is highest early because the grafts haven’t stabilized into the tissue yet.
- Good news: gentle contact (foam placed softly, light rinsing) is typically safe when started at the time your clinic recommends.
Clean scalp vs. infection risk: why hygiene matters for growth
“Avoid touching it” is only half the story. A scalp that’s never cleaned can trap sweat, oil, and debris—leading to irritation and sometimes folliculitis-like bumps. The goal is a balanced approach: keep the area clean without disturbing healing.
- Cleanliness supports comfort (less itch, less crust buildup).
- Lower irritation can mean fewer “panic moments” where patients scratch in their sleep.
- Better aftercare habits reduce preventable setbacks—one of the most overlooked hair transplant recovery tips.
The difference between recipient area and donor area during washing
When learning how to clean scalp after hair transplant, separate your scalp into two zones—because they behave differently:
- Recipient area (where grafts were implanted): must be treated with maximum gentleness. Early on, you’ll use a “place-and-rinse” method—no rubbing.
- Donor area (where follicles were harvested): often tolerates slightly more contact sooner, but still requires gentle technique. It may feel tight, tender, or “sunburned.”
- Swelling considerations: overly hot water or long showers can increase swelling—especially in the first week.
When Can You Start Washing Hair After a Transplant? (Day-by-Day Timeline)
The timing of your first hair wash after hair transplant depends on your clinic’s protocol, your scalp sensitivity, and how quickly you form scabs. But most patients follow a phased approach: first you protect grafts, then you clean gently, then you soften and lift scabs safely. These hair transplant washing instructions are designed to reduce friction and keep healing on track.
| Timeframe | What you should do | What to avoid |
|---|---|---|
| Day 0–2 | Saline spray as directed, keep scalp clean/dry, sleep with head elevated | Shower pressure, rubbing, hot water, sweating |
| Days 3–7 | Start gentle washing (foam/low contact), careful rinsing, pat-dry | Scratching, scab picking, towel friction, high-pressure rinse |
| Days 8–14 | Continue gentle washes; focus on softening scabs so they lift naturally | Forceful “removal,” fingernail scratching, harsh shampoos/actives |
| After 2 weeks | Transition toward a normal shower routine (still gentle if sensitive) | Aggressive exfoliation, strong styling products too soon |
Important: If your clinic told you a different start day for washing, follow that. The safest plan is always the surgeon’s plan—especially if you had a high graft count or very dense implantation.
Day 0–2: Spray-only phase (what to do instead of washing)
In the first 48 hours, the priority is stabilization. Most protocols avoid direct washing because even gentle water flow can loosen early crusts or increase swelling. This is a core part of hair transplant aftercare.
- Use saline spray exactly as instructed to keep grafts hydrated and reduce tightness.
- Keep hands off the recipient area. No “checking,” no touching to see if it hurts, no tapping.
- Avoid sweat and steam. Heat can increase swelling and itch—two triggers for accidental scratching.
- Sleep elevated to help swelling settle (especially days 1–3).
Days 3–7: First gentle wash phase (what “gentle” actually looks like)
This is when many patients start the first hair wash after hair transplant. The technique should feel almost “too careful.” That’s normal. Your goal is to cleanse the surface without creating friction on the grafts.
- Foam first: Lather shampoo in your hands (or use a foam method if advised), then place it over the recipient area—no rubbing.
- Low-pressure rinse: Use a cup or very gentle shower flow. Let water run over the scalp rather than hitting it directly.
- Donor area: Usually tolerates slightly more contact, but keep it gentle and avoid scrubbing.
- Drying: Pat-dry with a soft towel or let it air-dry. No towel rubbing.
If you’re searching for how to wash hair after FUE transplant vs. how to wash hair after DHI transplant, the core rules are the same: protect grafts from friction and pressure. Differences are usually about comfort and scab density—not “a totally different wash.”
Days 8–14: Scab-softening and controlled removal phase
By the second week, scabs typically start loosening. This phase is where technique prevents two common problems: (1) scabs that linger too long and increase itch, and (2) scabs that are forcibly removed and irritate the skin.
- Soften, don’t scrape: Let shampoo/foam sit briefly (as advised) to soften crusts.
- Gentle fingertip contact only—no nails. If a scab resists, it’s not ready.
- Consistency beats force: Daily gentle washing usually clears scabs naturally across this window.
After 2 weeks: transitioning back to a normal shower routine
After around 14 days, grafts are typically more stable, and you can gradually return to a normal shower routine—still with common sense. Many patients can increase water flow and wash more normally, but if your scalp remains sensitive, keep it gentle a bit longer (a smart long-term approach to hair transplant recovery tips).
- Increase pressure gradually rather than suddenly switching to a strong showerhead.
- Reintroduce products carefully: avoid harsh actives or heavy styling products until your clinic gives the green light.
- Listen to your scalp: persistent burning, increasing redness, or pimples/bumps deserve a quick message to your team.
Step-by-Step: Washing Hair After Transplant (Clinic-Approved Method)
This is the practical “do it exactly like this” section. The safest approach to washing hair after transplant is a low-friction routine that cleans the scalp surface while keeping the grafts calm. Follow these hair transplant washing instructions closely—especially during your first week.
Goal: Clean without rubbing. Rinse without pressure. Dry without friction.
Before you start: water temperature, setup, and clean hands
Preparation prevents mistakes. Most problems happen when patients rush, use hot water, or wash “like normal.”
- Wash your hands first (short nails, no rings/watches that can scrape).
- Use lukewarm water—not hot. Heat can worsen swelling and itch.
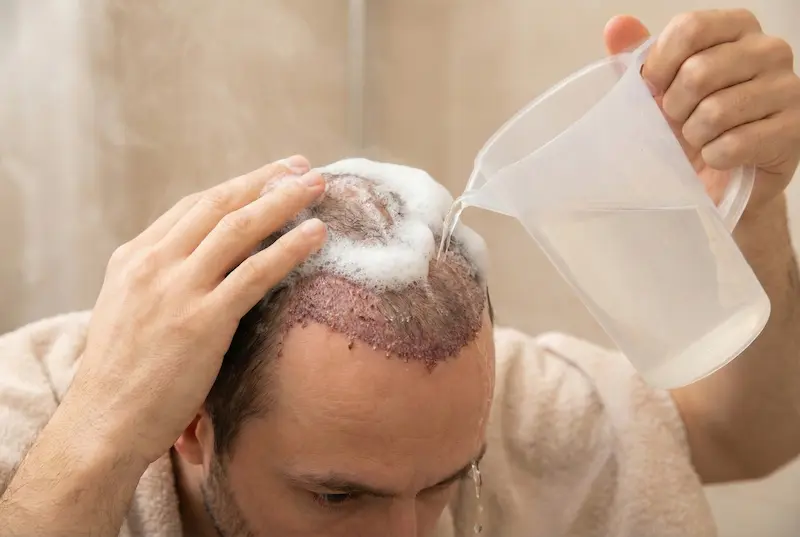
- Choose a low-pressure method: a clean cup/pitcher is often safest early on.
- Have a soft towel ready for pat-drying (no rubbing).
How to apply shampoo/foam without rubbing the grafts
Whether you’re looking up how to wash hair after FUE transplant or how to wash hair after DHI transplant, the key is the same: apply product to the recipient area as a “blanket,” not a scrub.
- Pre-foam in your hands (or use foam if your clinic recommended it).
- Place the foam gently onto the recipient area—do not massage it in.
- Donor area: you may cleanse a little more normally, but still gently—no aggressive scrubbing.
- Let it sit briefly (if advised) to soften oil/crusts rather than forcing removal.
How to rinse safely (low pressure, angle, and technique)
Rinsing is where people accidentally “blast” the grafts. Keep water flow soft and indirect.
- Use a cup rinse or a very gentle shower stream.
- Angle matters: let water run over the scalp instead of hitting grafts head-on.
- No prolonged soaking early on—short, controlled rinses are better.
- If scabs remain: that’s normal. Do not try to “finish the job” in one wash.
Drying the right way: pat-dry rules and what to avoid
Drying is as important as washing. Towel friction can irritate healing skin and pull on crusts.
- Pat-dry only with a soft, clean towel.
- Air-dry is fine if you’re not cold and you can avoid touching the scalp.
- Avoid rubbing or twisting hair with the towel.
- Hair dryer: if allowed later, use cool or low heat from a distance—never hot air close to the grafts.
| Step | Do | Avoid |
|---|---|---|
| Apply shampoo | Foam in hands, gently place on scalp | Rubbing, massaging, circular scrubbing |
| Rinse | Low pressure, indirect flow, cup rinse | High-pressure showerhead, direct jet |
| Dry | Pat-dry softly, clean towel, air-dry | Towel rubbing, hot blow-drying, scratching |
What NOT to Do: Common Hair-Washing Mistakes That Can Ruin Results
Most setbacks after the first hair wash after hair transplant don’t come from “using the wrong shampoo.” They come from friction, pressure, and panic behaviors—scratching, picking, over-washing, or trying to remove scabs too fast. These are the most common mistakes we see in real-world hair transplant aftercare.
Rule of thumb: If it feels like a “normal shower,” it’s probably too aggressive for the first 10–14 days.
Rubbing, scratching, “checking” grafts, or picking scabs
Itch is normal, but scratching is risky—especially with fingernails. Picking scabs is one of the fastest ways to irritate healing tissue and potentially disturb graft sites.
- Don’t scratch with nails even if you feel “just one spot” itching.
- Don’t pick or peel scabs to “see how it looks underneath.” Scabs should soften and lift gradually.
- Don’t “test” grafts by touching, tapping, or rubbing to see if they’re secure.
- Safer alternative: follow your saline/soothing routine and keep washing gentle and consistent.
High-pressure showerheads, hot water, and long steamy showers
Pressure and heat can both make recovery harder. Strong water jets can irritate the recipient area; hot water can increase swelling and itch—leading to more scratching.
- Avoid direct jet rinsing onto the recipient area in the first week.
- Skip hot showers and steam-heavy bathrooms early on.
- Keep showers brief—long exposure can over-soften scabs too quickly and inflame sensitive skin.
- Best practice: lukewarm water + low pressure + controlled rinse.
Towels, hair dryers, styling products, and harsh/medicated shampoos
Even if your washing technique is perfect, drying and product use can undo your progress. This is a key part of hair transplant washing instructions patients often overlook.
- No towel rubbing (recipient or donor). Pat-dry only.
- Avoid early blow-drying unless your clinic approves it—and then use cool/low heat from a distance.
- Hold styling products (gels, sprays, powders, fibers) until the scalp is fully calm and your team says it’s safe.
- Avoid harsh/medicated shampoos early (anti-dandruff actives, strong fragrances) unless specifically prescribed.
Hats/helmets and friction: when covering your head becomes risky
Many patients ask about hats because they want privacy. The issue isn’t the hat itself—it’s friction and pressure on a healing recipient area.
- Avoid tight hats that press on grafts, especially in the first 7–10 days.
- If your clinic allows a hat, choose a loose, clean, soft option that doesn’t rub when you move.
- Helmets are higher risk because they compress and trap heat/sweat—both can aggravate healing.
- Travel tip: if you must cover your head, confirm timing and the right hat type with your clinic first.
What Products and Tools Should You Use?
For most patients, the safest approach is simple: fewer products, fewer variables. During hair transplant aftercare, your scalp is reactive—so your product choices should support healing, not “treat” the scalp aggressively. The goal of these hair transplant washing instructions is to reduce irritation while keeping the area clean.
Shampoo checklist: mild, fragrance-free, pH-friendly options
If you’re unsure what to buy, choose the most basic, gentle shampoo you can find. In the first couple of weeks, “strong cleansing” is not a benefit—it’s often a trigger for dryness and itching.
- Mild cleanser (think: gentle daily shampoo, not “deep clean”)
- Fragrance-free or low-fragrance (less irritation risk)
- No strong actives unless your clinic prescribed them
- Easy to rinse (heavy formulas can tempt over-rinsing and friction)
Whether you’re researching how to wash hair after FUE transplant or how to wash hair after DHI transplant, the safest shampoo choice is usually the same: gentle and uncomplicated.
Saline sprays and moisturizers: when they help (and when they don’t)
Saline sprays are commonly used early on to keep graft sites comfortable and reduce tightness. Some clinics also recommend a specific lotion/foam protocol to soften scabs at the right time.
- Helpful when: your scalp feels tight, dry, or itchy; you’re in the first few days and not washing yet.
- Not helpful when: you’re “over-wetting” the area or applying too much product, too often, which can make the scalp feel soggy and irritated.
- Best practice: use only what your clinic instructed—more is not better.
Tools that protect grafts: soft towel, clean pillowcase, gentle cup rinse
Tools matter because most damage comes from accidental friction—especially during your first hair wash after hair transplant.
- Clean cup/pitcher: ideal for controlled, low-pressure rinsing.
- Soft, clean towel: pat-dry only (no rubbing).
- Clean pillowcases: change frequently in the first week to keep the area hygienic.
- Wide personal space: keep showers calm—no rushing, no bumping your head, no tight hats right after washing.
Product red flags: alcohol-heavy sprays, anti-dandruff actives, oils too early
Many “scalp care” products are too aggressive early on. If your goal is how to clean scalp after hair transplant safely, avoid anything that encourages scrubbing or adds irritation.
- Avoid alcohol-heavy tonics/sprays (can sting and dry the skin)
- Avoid anti-dandruff shampoos with strong actives unless prescribed (they can be irritating on healing skin)
- Avoid heavy oils early if your clinic didn’t recommend them—oily buildup can trap debris and tempt rubbing
- Avoid exfoliants/scalp scrubs until you’re fully healed
| Category | Safer choice (early phase) | Best to avoid (early phase) |
|---|---|---|
| Shampoo | Gentle, mild, low-fragrance | “Deep cleansing,” anti-dandruff actives, heavy fragrance |
| Rinsing | Cup rinse / low-pressure flow | High-pressure showerhead directed at grafts |
| Drying | Pat-dry / air-dry | Towel rubbing, hot blow-drying close to scalp |
| Styling | Wait until cleared by your clinic | Fibers, gels, sprays, perfumes on scalp too soon |
After Washing: What’s Normal vs. What’s a Red Flag
One reason patients obsess over washing hair after transplant is fear: “What if I mess it up?” The truth is, a healing scalp can look messy even when everything is going perfectly. This section helps you separate normal healing from signs that deserve quick medical advice—an essential part of hair transplant aftercare.
Practical mindset: Mild redness + scabs + itch are common. Worsening pain, spreading redness, or pus is not.
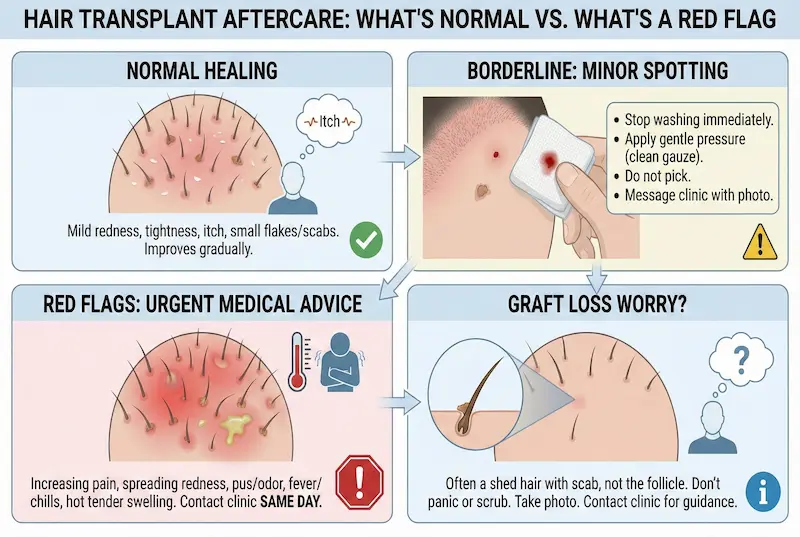
Normal: mild redness, tightness, itch, small flakes/scabs
Most patients experience some combination of these—especially around the time of the first hair wash after hair transplant and during scab-softening days.
- Redness: usually mild and gradually improves over days to weeks (varies by skin type).
- Tightness: common in both donor and recipient areas, especially after FUE.
- Itch: very common; usually peaks as scabs form and begin to loosen.
- Scabs/flakes: expected; should reduce gradually with consistent gentle washing.
Borderline: minor spotting/oozing—what to do immediately
A small amount of spotting can happen if a scab catches on clothing or you accidentally touch the area. The key is to stay calm and avoid “fixing” it with scrubbing.
- Stop washing immediately if you see fresh bleeding.
- Apply gentle pressure with a clean gauze/pad (do not rub).
- Do not pick the area to “clean the blood.”
- Message your clinic with a clear photo if you’re unsure.
Red flags: increasing pain, pus, fever, spreading redness—when to contact your team
These signs are not “normal healing” and should be evaluated quickly. If you’re following hair transplant washing instructions correctly and symptoms are still worsening, that’s a reason to contact your clinic the same day.
- Increasing pain instead of steady improvement
- Spreading redness that expands beyond the treated area
- Pus-like discharge or foul odor
- Fever/chills or feeling systemically unwell
- Hot, tender swelling that is getting worse
What to do if you think a graft came out
This is a common worry—especially after washing hair after transplant. Sometimes patients see a small crust with a hair attached and assume they “lost the graft.” In many cases, it’s just a shed hair with a scab, not the follicle unit itself.
- Don’t panic and don’t scrub to “check the area.”
- Take a photo of what you saw (if possible) and the scalp area.
- Contact your clinic for guidance—especially if you notice repeated bleeding or a clear open spot.
- Remember: early shedding can occur later as part of the normal cycle; that’s different from dislodging in the first days.
How AKM Clinic Supports a Safer Recovery (Especially for International Patients)
If you’re flying home soon after your procedure, the hardest part of hair transplant aftercare is often not the washing itself—it’s the uncertainty: “Is this normal?” “Did I do it right?” “Who do I contact if something changes?” A good clinic doesn’t just give you hair transplant washing instructions; it builds a system that reduces guesswork and supports healing long after you leave Istanbul.
Post-op recovery support: LLLT for graft healing and early growth support
Alongside careful washing and hygiene, AKM Clinic uses Low-Level Laser Therapy (LLLT) as part of recovery support for hair restoration patients. In simple terms, LLLT is designed to support the scalp environment by improving microcirculation and helping follicles transition into an active growth phase—while also supporting the healing process after a transplant.
- Why it matters: early healing is the foundation of healthy growth. Anything that reduces inflammation and supports tissue recovery can make the first 2–4 weeks smoother.
- What it is NOT: it’s not a substitute for correct washing hair after transplant. If the wash technique is rough, no device “fixes” friction damage.
- Where it fits: most useful during the early recovery window—when patients are anxious about scabs, redness, and “did I lose a graft?” moments.
“No abandonment” principle: remote follow-up and fast responses after you fly home
International patients often worry that support ends once they board the plane. The safest model is structured follow-up: you send clear photos, your team tells you what’s normal, and you get quick, practical adjustments (for example: “continue gentle foam washing,” “reduce water pressure,” or “do not pick scabs”). This is especially helpful during the first hair wash after hair transplant week and the scab-softening phase.
- Photo-based check-ins help confirm you’re washing correctly and healing normally.
- Fast answers reduce panic behaviors (scratching, over-washing, aggressive scab removal).
- Long-term follow-up is useful because recovery isn’t finished at day 14—patients often have questions during shedding and regrowth months.
Hygiene standards and controlled aftercare instructions (why protocols beat guesswork)
Proper washing is only one part of a safe outcome. The quality of sterility and hygiene protocols behind the scenes matters—because lower infection risk and cleaner healing make home care easier and less stressful.
- Structured protocols reduce “random advice” you find online and keep your routine consistent.
- Clear washing rules (foam placement, low-pressure rinsing, pat-drying) prevent the most common mistakes.
- Patient education helps you understand what you’re seeing: scabs, redness, itch, and why “gentle” is the fastest route to normal.
What to read next: growth timeline expectations and hairline planning
Once your washing routine is stable, the next two topics that reduce anxiety are: (1) what the normal growth timeline looks like month-by-month, and (2) what makes a hairline look truly natural. These two guides pair perfectly with hair transplant recovery tips—because they keep expectations realistic and prevent “false alarms” during shedding.
- Hair transplant growth timeline (what’s normal at 1, 3, 6, and 12 months)
- Hairline design explained (angles, density, and avoiding an obvious “transplant look”)
Frequently Asked Questions (FAQ): Washing Hair After Transplant
These answers are intentionally concise. If your clinic gave you different timing, follow their protocol—especially for your hair transplant washing instructions during the first two weeks.
Can I wash my hair every day after a transplant?
Often, yes—many protocols prefer consistent gentle washing once you’re cleared to start. The key is gentle technique, not how “thorough” you wash.
When can I take a normal shower (not cup rinsing)?
Commonly after the early healing window (around the first 10–14 days). Start gradually—low pressure first, then increase slowly.
When can I use conditioner?
Usually after the scalp calms down and scabs are mostly gone. If you use it, keep it off the recipient area early and avoid rubbing to apply or remove it.
When can I use a hair dryer?
If allowed, use cool or low heat from a distance. Avoid hot air close to the recipient area in the early phase.
What if scabs don’t come off by themselves?
Don’t force them. Continue gentle washing and softening. If scabs persist beyond the expected window, send photos to your clinic for guidance.
When can I wear a hat or helmet safely?
A loose, clean hat may be allowed earlier than a helmet—but timing varies. Avoid anything tight or abrasive that creates friction on grafts.
If I see shedding early on, did I lose my grafts?
Not necessarily. Early shedding later in the process can be part of the normal cycle. True early graft dislodging is more associated with friction/pressure in the first days—usually with bleeding or significant trauma.
If you’d like to go beyond washing hair after transplant, you may also find our guides helpful on the hair transplant growth timeline (what to expect month by month), natural hairline design (how surgeons plan a realistic, age-appropriate hairline), hair transplant cost (what drives pricing and what’s typically included), and sapphire hair transplant benefits (how sapphire blades may support cleaner incisions and healing). These topics can help you set clearer expectations, understand the aesthetics behind natural-looking results, and compare options more confidently before and after your procedure.